Showing posts with label tutorials. Show all posts

On The Third Day of Christmas

Friday, December 16, 2011

My true love gave to me ........


I saw these adorable ornaments on Miss Mustard Seed a few weeks ago and knew that they would be perfect for my tree


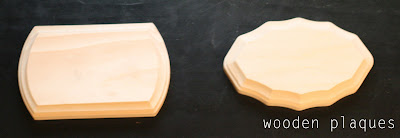
They are little mini Chalkboard ornaments with glittered edges! How perfect, right? So, I moseyed on over to Michaels and grabbed some cute little wooden plaques for only $0.59 a piece!


I had this fabulous Vintage Gold Paint from Martha Stewart I bought at Home Depot {I think it was around $7} and at Michaels I grabbed some matching glitter {hers is hands down the best glitter on the market} and headed home with my treasures.

I had some extra Chalkboard paint on hand, but if you want to order some great stuff, you can order Annie Sloan's chalkpaint from 'Round the Coop in Graphite . With 3 coats, it acts like a chalkboard!


The best thing about these is that they are the EASIEST and FASTEST. You simply:

1//  Spray or brush on the chalkboard paint on the front of the ornament. 

2//  Once the chalkboard paint is dry, take a small brush and apply the gold paint on the edges of the plaque {don't worry your little head about it being perfect}. 

3// After your first coat of paint is dry apply another thin coat of gold paint and shake glitter on while still wet. 

4// Once the glitter/paint is dry, just staple some twine or ribbon to the back of the ornament- then you can either leave the chalkboard blank or write whatever you want on the front!


I made one for each of my kids and wrote their names in chalk. I thought it needed to stand out a little more so I went over my chalk outline with white paint. I really really love them- I want to make some for Braden & I as well!


Someone Strike Up The Band

Tuesday, August 9, 2011

Because HALLELUJAH! I've got it! I'm proud to say that I've finally conquered the elusive crochet hook!

I've been trying to learn how to crochet for-damn-ever and FINALLY it came to me. Crocheting is one of those things that no matter how many sleepless nights you stay awake until 3:30 am watching tutorials on YouTube (not sayin I did that), it just doesn't click until you have a real person show you. Even then my poor grandma had to listen to my frustrated rantings during our Tucson vacation in July as she tried patiently to teach me how to get the hang of it. But I just couldn't I'd get all stressed out about the yarn tension, and how to hold my hands, and how tightly to grip the hook, and which string to go under and how many times I wrap the needle, and AAAHHHHHH!!!!!!

The anxiety about killed me.

But lo and behold- I left crocheting alone for a few weeks, and upon revisiting it, I got it! It was a revelation! You really have to find your groove with crocheting, but once you find it there's no turning back. It's really quite addicting.

I've been obsessing over crochet ideas lately, and I decided to try my hand at this blanket:


Isn't it lovely? Except my blocks are completely wonky and uneven, but really that matters not because it will just make it look eccentric and funky. (Maybe if I just keep telling myself that it will come true). The tutorial for the blanket is found at Dottie Angel's, which is full of crafty goodness.

In the meantime, I wanted to crochet something for my dear little Lola (my first niece ever!) that will be coming into the world in the winter, so I found a wonderful Baby Beanie tutorial on Crochet Geek. I put in into a PNG file so I could remember where it is and not get lost in my bookmarks folder of Doom.


Mine turned out a bit pointy up top, so I decided it needed a pom pom. The pom pom tutorial is from Candice Carpenter's blog


I also added a sweet little flower on the edge to give it some pizzaz (every baby loves a little piz-AZZ, you know). I can't find the tutorial I used for the flowers, so I'll keep looking and post it soon!


So that's my latest crafting adventure. I feel so accomplished. Now I have a pile of scrap fabric waiting to be turned into a Back To School Dress for little Penelope, who's first day of preschool with her brother Landen is next Tuesday. Get ready for some momma tears.


Tutorial Tuesday: Easy 4th of July Home Decor

Tuesday, June 28, 2011

I was crafting away yesterday. trying to bring the 4th of July Spirit into our home. I have some different tutorials to share to spread the Indepence day cheer quickly and cheaply:

Free Printables!


Tutorials!


Tin Can Luminaries


Rockets


More Free Printables


Burlap Wreath

Inspiration to Creation: Project 3

Tuesday, May 10, 2011

Are you ready for my latest Inspiration to Creation? My idea for this project came from this chair done by Miss Mustard Seed:


I went to the good ole' Goodwill by my house and scored this broken cane-backed chair for $13.


Then I followed the tutorial Miss Mustard Seed had on her blog about how to do the chair above. There's 3 posts in all- one on the finishing, one on the upholstered back, and one on the pleated slipcover.

Here's the process of the finishing:


First I painted it in the Georgian Blue from Sherwin Wililams- I just bought the $6 sample size


Then I dry brushed it with the French Grey from Behr- used the $3 sample size


Next I sanded the whole thing down with a coarse sandpaper to scratch up the paint really good and burnish the edges. Here is where I made a change from Miss Mustard Seed's tutorial: I used a Salem colored stain to glaze the piece instead of using actual faux finish glaze, just because we have it on hand for Braden's furniture finishing.

I also wanted to add a little more pizzaz to the piece so I bought some metallic silver & gold acrylic paint from JoAnne's and added some random smudges of gold & silver to the piece. It made a HUGE difference!


So there's the Finishing Process, then I followed her directions for the seat slipcover & the upholstery. Braden was in charge of the stapler gun naturally, since i was bound to shoot myself in the foot (literally). I don't have pictures of that process though. Again I jzsoojed up the MMS tutorial by adding some ruffled flowers that were inspired by April Meeker, who was sweet as peach pie to share the secret to these!

All the upholstery is done with canvas dropcloth from the painting section at home depot!

And here is the full reveal! Ta-dahhh!


I'm super happy with it. Bows, ruffle flowers, pleated skirted slipcovers, and metallic distressed paint? All my favorite things in one chair.

I Love Hot Glue: Felt Bow Tutorial

Sunday, April 17, 2011

I've been wanting to do a refresher on my girls bows & hair clips for a while, so I looked around for some ideas for stuff to make them and I remembered Lou & Lee.

Source: etsy.com via Rosemary on Pinterest


Source: etsy.com via Rosemary on Pinterest


Source: etsy.com via Rosemary on Pinterest


Source: etsy.com via Rosemary on Pinterest


They have some really really cute stuff (their shop is on vacation right now, but once they're back you can check them out), and I fell in love with these felt bows, so I decided to make some for the girls. Then I got kind of obsessed and made 4 in each color. It's a good start to a Spring/Summer Bow collection- and now here's a Felt Bow Tutorial so you can make your own!


Materials:
Felt
Hot glue Gun
Hot glue sticks
Alligator clips
Scissors

That's it. Easy as pie.

Step One:
Cut 2 strips of felt- One 7" x 1.5" piece for the body, and one 4" x 1" piece for the center.


Step Two:
Fold the body piece in half hot-dog style and snip the corners off to notch the ends.


Step Three:
Fold the body piece like so:


Step Four:
Add Hot Glue to the center of the fold and the underside of the fold.


Step Five:
Repeat with the other end of the body piece. It should look like this:


Step Six:
Glue one end of the center piece to the back of the body


Step Seven:
Wrap the center piece around the front tightly to pinch the middle of the bow and hot glue in back. Trim any excess center strip off.


Step Eight:
Clip an alligator clip to a piece of felt and cut around in rectangle. Hot glue to the back side of your bow.


The End. Now go forth and multiply these bows in every color to make your own collection.

Tutorial Tuesday- Ruffled Party Streamers

Tuesday, March 8, 2011

When I went searching for ideas for the twins party I came across How Does She who threw her own twin girls a party based on the Eat Drink Chic Ice Cream Parlour

My favorite part about her party was the ruffled pink & white striped background she used- it looks sooooo cute.

Lucky for me she has a tutorial for it! Hip Hip Hooray! Now you must excuse me, because I have to sew a ton of crepe paper.....

Tutorial Tuesday-Cupcake Decor

Tuesday, February 1, 2011

Soooo, while I was falling in love with TomKat, I found that she does Cupcake Mondays and has a ton of tutorials. This one for DIY cupcake stands is my favorite.


Followed by this one for ruffled cupcakes.


Theres a ton more she has featured- I have a feeling my house is going to be overflowing with cupcake stands soon