Showing posts with label crafts. Show all posts

Weekly Sewing Project: Easy Peasy Throw Pillow Covers

Thursday, April 19, 2012

Do you ever have those awful awful things in your house that you walk by every single day and say to yourself  "I really need to fix/clean/trash/burn that thing", but instead of doing something about it, you just ignore it and it just sits there being gross day after day until finally you cannot look at it for one more second or someone is going to lose a body part?

No? Well, then I must be the only one. Because I swear, our couch throw pillows have gotton so much dirt and glitter and snot and black sharpie and yogurt and God knows what else on them they were starting to make me gag every time I sat down. So finally FINALLY I decided that something needed to be done. A quick google search later, I had found this tutorial on how to make quick & easy throw pillow covers. 


They really only took an hour and a half and I have no idea how much fabric I used because I had a spare piece of black linen in my stash (which I'm sure was supposed to turn into a dress years ago) so this project was *sort of* free. You can mix & match the front and 2 back panels too, so it's easy to get rid of some of your fabric pieces that you've been hoarding for years.


My pillows were 21" x 21", but now I want to create a whole slew of easy couch throw pillows. Perhaps I can try this one next with my leftover black scraps and some white stripes. Perhaps next week?


Our Baby #6 mail announcements

Monday, February 13, 2012

So, for those of you that missed the announcement- we're having another baby! And this one makes #6 for us, so while it's not my first rodeo, I am excited to bust out all the cute ideas that I have been hoarding that involve babies! Plus, I'll take any excuse to celebrate so, Hurrah! We found out the very last day of February {which is my excuse for my long absence here} and had to come up with a creative way to tell our families before we made the public/FB/blog announcement. Once everyone called and said they received their mail, it was a go to tell the world! This is what we sent out.....


Creative Team Tuesday: Kiss Me Collection Preview

Tuesday, January 17, 2012

Rhonna has worked her magic for the sweetest Valentines Kit evah! Check out her new Kiss me Collection to cover all your Love Day decorating, scrapbooking, valentines, facebook page, and anything else you can think of!


$6


$5


$2.99


$10


$6


$6


$6


$6

And if you want the whole spicy enchilada, you can get ALL the Kiss me Kits in this fabulous bundle!


$24

There is oh-so-much you can do with these kits, I can't wait to get started today! But first I MUST get to the store and buy some white cardstock, some ink, some coffee filters, and some tissue paper to start creating all my Valentines Day fanciness! 


Valentines Ideas & Crafts

Monday, January 16, 2012

I've been gathering ideas to decorate my house for Love Day, and look at all the fun stuff I've found!


Source: etsy.com via Rosemary on Pinterest


I can't wait to dive into some Love Day Creativity tomorrow!

On The Fourth Day of Christmas

Saturday, December 17, 2011


One of my most favorite Rhonna Designs digital kits are the Christmas Junque Backgrounds


I especially love the design with the junquey banner going across the page. This paper inspired me to do a similar banner for my piano

I just layered book pages, some Christmas Junque Background paper, some printed out Christmas music, and random bits of stuff I've been stashing. There's kraft snowflakes, some glittery poinsettias and leaves, scalloped punched kraft paper & gold glitter paper and even some tickets that I stamped with some Christmas Art Brushes 


On The Third Day of Christmas

Friday, December 16, 2011

My true love gave to me ........


I saw these adorable ornaments on Miss Mustard Seed a few weeks ago and knew that they would be perfect for my tree


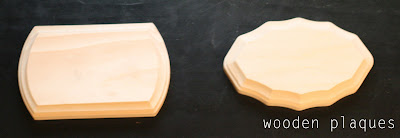
They are little mini Chalkboard ornaments with glittered edges! How perfect, right? So, I moseyed on over to Michaels and grabbed some cute little wooden plaques for only $0.59 a piece!


I had this fabulous Vintage Gold Paint from Martha Stewart I bought at Home Depot {I think it was around $7} and at Michaels I grabbed some matching glitter {hers is hands down the best glitter on the market} and headed home with my treasures.

I had some extra Chalkboard paint on hand, but if you want to order some great stuff, you can order Annie Sloan's chalkpaint from 'Round the Coop in Graphite . With 3 coats, it acts like a chalkboard!


The best thing about these is that they are the EASIEST and FASTEST. You simply:

1//  Spray or brush on the chalkboard paint on the front of the ornament. 

2//  Once the chalkboard paint is dry, take a small brush and apply the gold paint on the edges of the plaque {don't worry your little head about it being perfect}. 

3// After your first coat of paint is dry apply another thin coat of gold paint and shake glitter on while still wet. 

4// Once the glitter/paint is dry, just staple some twine or ribbon to the back of the ornament- then you can either leave the chalkboard blank or write whatever you want on the front!


I made one for each of my kids and wrote their names in chalk. I thought it needed to stand out a little more so I went over my chalk outline with white paint. I really really love them- I want to make some for Braden & I as well!


Happy Haunting Day 4: Ghostly Glam Wreath

Monday, October 17, 2011

Our Happy Haunting Feature today is  Ghostly Glam Wreath Tutorial!


And created my own Ghostly Glam wreath using my favorite paper crafts:


I had a TON of plumbing pipe "wreaths" made up from my Thanksgiving Hello! Holidays craft for hello there! house, so I created this easy peasy wreath using a homemade wreath form, some leftover white sheets I bought at Goodwill, and some Spooky Junque Designs

1) Cut foam piping to size you want your wreath and duct tape your wreath into a circle. 
2) Rip a piece of sheeting into strips and hot glue the end of one strip to the inside of the wreath form. Wrap strip around the wreath form to cover the entire wreath attaching ends with hot glue to wreath and adding more strips as you go. 
3) Once the wreath is completely wrapped, cut and tie small strips randomly along wreath to look like "mummy wrap"
4) Print out Bat pattern, cut out and trace along a piece of chipboard (I used a cereal box). Paint bat black and glitter (I use Martha's)
5) I hung the bat on a giant doily from Hobby Lobby then glued one of the Spooky Junque Labels on it
6) I made kraft paper lollies from lunch bags, and glued on some Spooky Junque Brushes I punched out with my scalloped circle punch
7) Last I made some mini black tissue paper poms to look like flowers and hot glued those on there with some mini flags I made with the Spooky Junque Backgrounds & words from the Spooky Junque Candy Cone Kit. These kits are so awesome because there is so many little pieces you can mix & match on a variety of projects. 
8) I hung the whole thing up using black Divine Twine and called it a day. Make one for yourself! 


Team Tuesday: Harvest Wreath made at hello there! house

Tuesday, October 11, 2011


Now that hello there! house has finally finished up it's first event, I can share this fun project I've been hoarding using Rhonna Designs Grateful Glam Flags & Tags Kit!


This Harvest Wreath was made with the budget crafter in mind. I came across this little gem on Pinterest:


That sent me on over to Home Depot to clean out their plumbing foam piping to cut in half, tape, and VOILA! you have 2 foam wreaths for $0.97!


I wanted a more simple and streamlined wreath, so I simply cut strips of burlap about 3" wide and wrapped them around the wreath, hot gluing as I wrapped underneath to secure. I bought the burlap at Joanne's last November- one whole bolt of 10 yards for $25. I have finally gone through it all and went to get another bolt, but they didn't have them anymore. I'm hoping they get the bolts back in stock for Thanksgiving- until then, their burlap that you cut off the bolt is $3.99/yard but you can usually use a 40% coupon {get the Joanne's app for your phone- never have to carry in coupons again!} and get a lot for a great deal. You would only need about a half yard for one wreath, however this is our Hello! Holidays: Thanksgiving project for hello there! house, so I made up 50 kits. 


I then grabbed a white bedsheet I got at Goodwill for $1, and ripped 3 strips across the width of the fabric to hot glue into rosettes. The technique for the rosettes is the same as I shared on Jaimee's blog last year, but you hot glue the rosette onto felt as you go along {shown on Rhonna Farrer's video tutorial here}


I wanted to another simple detail to the wreath, so I printed off a page from Rhonna Designs Grateful Glam Flags & Tags kit, cut out the mini buntings and hot glued them to a piece of brown Divine Twine, then cut out a banner element and hot glued it onto my rosettes. 


To finish it all off I cut a piece of 1.5" satin ribbon I bought at SAS fabric in Tempe {$5 for a bolt of 50 yards} and there you have it. An extremely inexpensive, utterly lovely Harvest wreath that can be used all throughout Autumn. Add some white pumpkins to your doorstep, and you have a chic doorscape (did I just invent that word?) to welcome your guests. 

Visit Rhonna's Blog to see everyone else's Team Tuesday entries!

Team Tuesday: Quatrefoil Love

Tuesday, September 6, 2011


When I saw the Quatrefoil Kits in the Rhonna Designs store,  I felt a surge of happiness- it's absolutely fantastic! And $4? Seriously, there is so much you can do with this thing. The first thing I thought of was home decor. If you've ever been to my house, you know that I have a tendency to decorate everyday like a party. I have banners, pom poms, signs, & flags all over the place all the time; and I think it adds a little festivity to the "glamourous" life of being a mom of 5.  Happy home decor just makes me feel good. So that's just what I set out to make.

I grabbed a couple of small mason jars and filled them with flour, then grabbed a big old crusty mason jar and spray painted it platinum. I tied some Divine Twine to them and printed off some of the Quatrefoil tags really small and punched them out with my scallop punch. 

Then I made the flags. I added some inspirational words to them, added a graph paper background, then just printed them out & cut! I hot glued them to skewers and made some little mini flags to fancy them up. More scalloped round tag punches were hot glued on, and a tissue paper fringe pom topped a few flags.


How fun are these? They are now sitting on my computer center and remind everyone who walks in to stay inspired & creative. Oh, and don't you love the frames I used on the photos above {wink}?


$5


Check out Rhonna's Blog to see some other Team Tuesday entries!